ZJK
Developers
- Thread Author
- #2
Mapping Guidelines
Showcase your creativity by building unique stuntage arenas.
Make sure to follow these guidelines to have your work approved!
RULES & BEST PRACTISES
-
CREATIVITY & UNIQUENESS
- Think creatively and come up with fresh, innovative ideas. Aim to be as original as possible when designing your stunt arena.
- Small scripts like moving objects, teleports, speed & jumps are allowed for added creativity. (Avoid overusing scripts, or your arena will be IMMEDIATELY declined. All scripts will be reviewed before the arena is accepted. First contact Heads of Stuntage ahead of adding scripts for more information)
- Only a few shaders and custom objects are allowed, but they must NOT be abused. Any misuse will result in their immediate removal.
-
ARENA & STUNTS
- Your arena must be created in 60 FPS.
- Your arena must NOT be connected to the San Andreas map.
- Your arena should have a minimum of 20 stunts and a maximum of 200 stunts.
- Don’t overload your arena with too many objects. Keeping it simple is essential for optimal performance.
- You can add stunts to your existing arenas if it did not reach the limit yet. (If you want to add more stunts to your existing arena, you must first contact the Heads of Stuntage BEFORE editing your arena and they will guide you)
-
WHAT TO AVOID
- NO EXPLOITING BUGS OR GLITCHES: Avoid stunts that rely on bugs like super jumps or underworld warps. (The exception is the "speed bug" for motorcycles.)
- STUNT BLIPS NOT OVERLAPP ON THE MINIMAP. Placing two stunts at the exact same — or nearly identical — X/Y coordinates is not allowed, as it would make both blips stack on top of each other, preventing players from distinguishing or hovering over them individually using the F2 map.
- NO FORCED COLLISIONS: Stunts should not require players or vehicles to collide to complete them.
- NO SIMPLE STUNTS: Avoid stunts that are just about driving to a destination without any real challenge.
- NO REPETITIVE HEIGHTS: Don’t create stunts that are just at different heights in the same spot (e.g., on stairs).
- NO DECORATIVE VEHICLES/MARKERS: Everything in your arena should have a purpose, not just serve as decoration.
-
NO BLACKLISTED VEHICLES: These vehicles should not be used in stunts (see vehicle categories & IDs) :
- Trailers
- Trains & Railroad cars
-
Vehicles with weapons:
- Hunter [425]
- Predator [430]
- RC Baron [464]
- Seasparrow [447]
- Police Maverick [497]
- Hydra [520]
Want to create your own arena or need help with anything? Just send us a message and we'll take care of it!
REWARD LIMITS
Easy
$1 — $500
Medium
$500 — $2,000
Hard
$2,000 — $3,000
Very Hard
$3,000 — $5,000
Demonic
$5,000 — $15,000
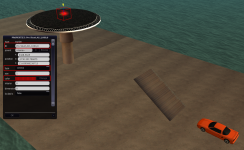
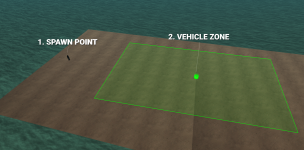
SPAWNPOINT & VEHICLE ZONE
Your first step is to create a spawn point for players to spawn and respawn, along with a vehicle zone where they can create vehicles:
WARNING: The spawn point and vehicle zone must be clear of any objects or obstacles to ensure players don’t get stuck or have trouble spawning a vehicle. Additionally, the spawn point must NOT be inside the vehicle zone!

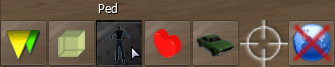
1. CREATE A SPAWNPOINT
Simply create a ped, it will be used to define the spawnpoint for your arena.

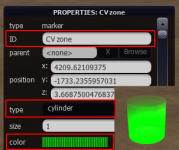
2. CREATE A VEHICLE ZONE
- 1. Create a marker and press F3 to edit it.
- 2. Change the type to Cylinder.
- 3. Change the color to green.

STUNTS
Now that your arena is ready, let’s add the first stunt!
- 1. Create a marker and press F3 to edit it.
-
2. Change the ID of the marker to this format:
- Name: Stunt's name.
-
VehicleID:
- ID: Vehicle that will be required to complete the stunt. (https://wiki.multitheftauto.com/wiki/Vehicle_IDs)
- 0 = Any vehicle: You will be able to complete this stunt with any vehicle except from Planes and Helicopters.
- Money: Reward in cash for completing the stunt. (see reward limits above)
-
Timer: The way the stunt has to be completed:
- 0 = Stunt will be completed on touch.
- 1 = Stunt will be completed after staying 3 seconds on it.
Name,VehicleID,Money,Timer
- 3. Change the type to Corona.
- 4. Change the color to red.

NOTE: You can adjust the size of markers if needed, but we recommend keeping them at a minimum size of 2 to ensure they remain playable.
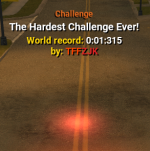
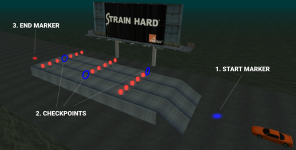
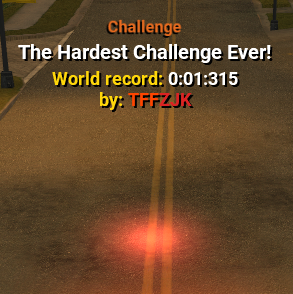
CHALLENGES
In addition to regular stunts, you can create timed stunt challenges!
These challenges function like races, requiring a starting marker, checkpoints, and an ending marker.
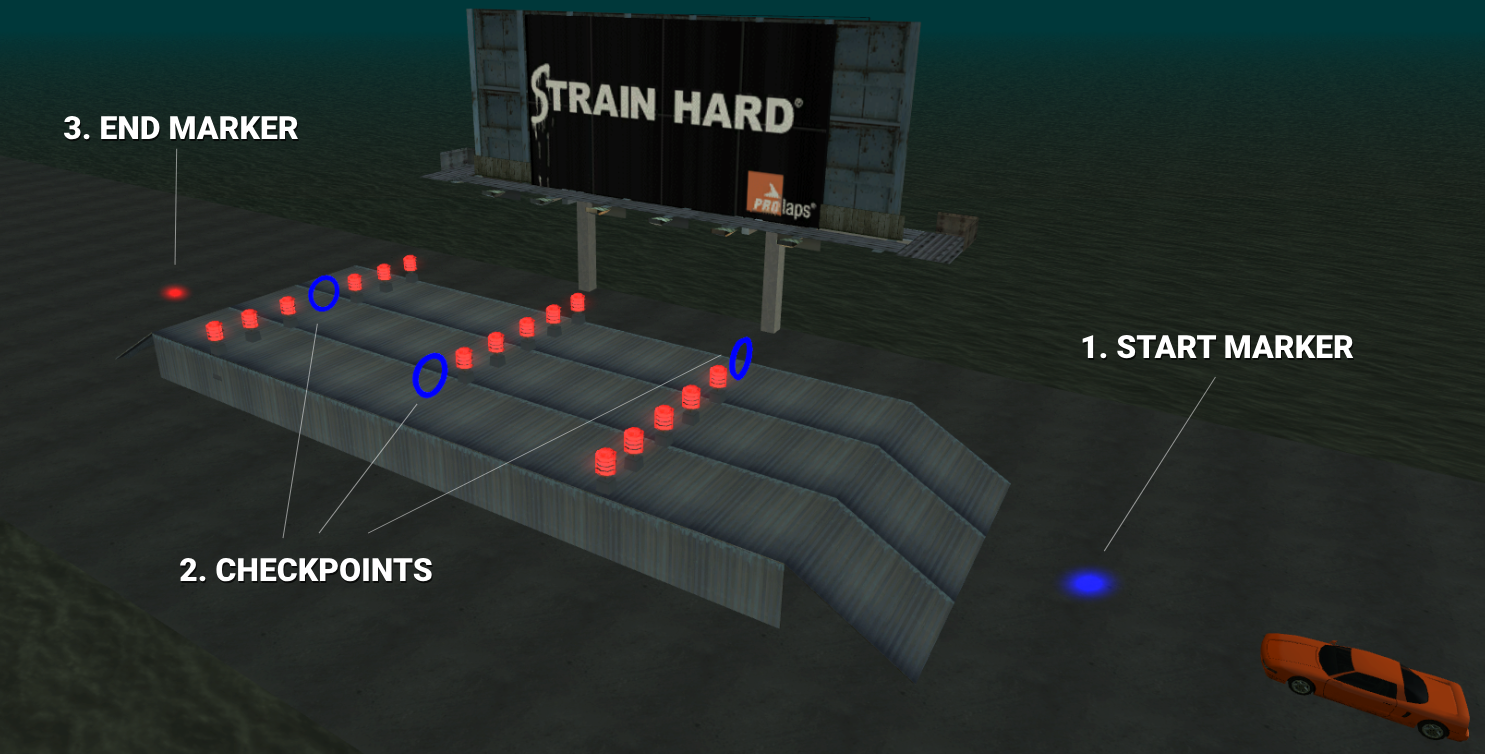
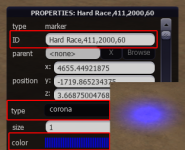
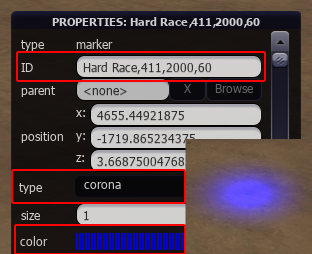
1. START MARKER
To allow the player to initiate the challenge and start the timer, we need to create a starting point for it.
- 1. Create a marker and press F3 to edit it.
-
2. Change the ID of the marker to this format
- ChallengeName: Challenge's name.
-
VehicleID:
- ID: Vehicle that will be required to complete the stunt. (https://wiki.multitheftauto.com/wiki/Vehicle_IDs)
- 0 = Any vehicle: You will be able to complete this stunt with any vehicle except from Planes and Helicopters.
- Money: Reward in cash for completing the stunt. (see reward limits above)
- Timelimit: The maximum time limit to finish the challenge in seconds. (max: 30 minutes)
ChallengeName,VehicleID,Money,Timelimit
- 3. Change the type to Corona.
- 4. Change the color to blue.
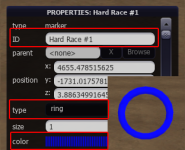
2. CHECKPOINTS
You must make sure they have the same challenge name in the ID followed by the checkpoint number.
For example if your challenge name is "Hard Race", you must name checkpoints in the correct order: "Hard Race #1", "Hard Race #2" etc..
- 1. Create a marker and press F3 to edit it.
-
2. Change the ID of the marker to this format:
- ChallengeName #ID: Challenge's name followed by the ID of the checkpoint.
Challenge Name #ID
- 3. Change the type to Ring.
- 4. Change the color to blue.

(OPTIONAL) JUMP MARKERS NEW
Jumps allow players to press LSHIFT to jump when they are inside the marker. Available only during challenges, they have a 1-second cooldown between each jump.
You must make sure they have the same challenge name in the ID followed by the jump number, as well as the velocity power.
TIP: You can use Coronas when placing them to ease the process, and once you are done, change them all to Arrows. (more info in the steps below)
- 1. Create a marker and press F3 to edit it.
- 2. Change the type to Corona, to make it easier when placing it.
- 3. Change the size of the marker. (We recommend a minimum size of 3, as jumping within the marker becomes increasingly difficult below this size)
-
4. Change the ID of the marker to this format:
- ChallengeName #ID: Challenge's name followed by the ID of the jump.
- Velocity Power: It must be a number between 0.1 and 0.9, it will define the power of the jump.
Challenge Name #ID,0.3
- 5. Change the color to magenta.
- 6. Once the jump marker is ready, update its type to Arrow.
NOTE: A tool will be provided in the future to allow you to test your jump markers.
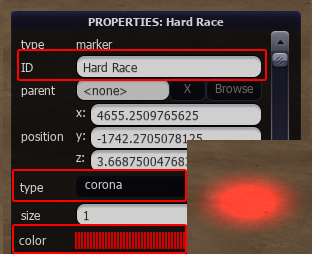
3. END MARKER
This will be the final marker to finish the challenge.
- 1. Create a marker and press F3 to edit it.
-
2. Change the ID of the marker to this format
- ChallengeName: Challenge's name.
- 3. Change the type to Corona.
- 4. Change the color to red.
SUBMISSION
Now that your arena is complete, it’s time to upload it to our server.
Make sure the .zip containing your map is named in this format:
[STUNTAGE]ArenaName.zip
And also make sure your map name contains the tag [STUNTAGE]
[STUNTAGE] Arena Name
There’s no specific deadline for submissions.
Once you upload your arena, our Heads of Stuntage will carefully review it to ensure it meets all guidelines.
After approval, your map will be accepted and added to the server!
This process takes time, so we appreciate your patience.